Current & Recent Projects
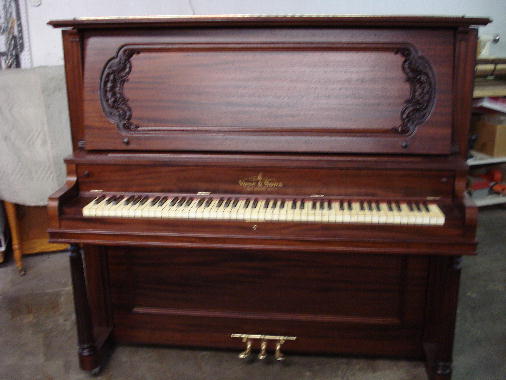
55 1/2" Vose & Sons Upright #60219 (1905)
Red mahogany cabinet. Exterior finish severely damaged by a house fire, but the piano's frame is sound, strings can be replaced and the action can be restored. Reconditioned by Ray's Piano Service in Summer-Fall, 2017 for the owner in New London, MN. Refinished by Mike Frank's Custom Furniture, Foreston, MN.
IMPROVEMENTS:
Dismantle & Clean--Remove all panels, keybed, pedal board, strings, pins, casters. Complete cleaning.
Repair Board & Restring--Sand soundboard, shim cracks, refinish board, clean plate bolts and screws.
Restring & Repin--Install new strings and larger-size pins.
Recondition Action—Install new hammers, dampers, bridle tapes, replace defective parts, tighten screws, lubricate rails.
Complete Regulation—All adjustments to ensure that piano plays like new, tune to A-440.
Refinishing (on sub-contract with Mike Frank's Custom Furniture, Foreston)--Strip veneer surfaces, sand, repair and reglue veneer as needed. Refinish. Install new fallboard decal.
Reassembly & Delivery--Clean all cabinet screws. Re-install keybed and pedal board. Install new casters. Install new nameboard felt. Replace panels. Delivery to owner after completion of replacement home.
Selected pictures of the step-by-step improvement process
CLICK PICTURE FOR LARGER IMAGE, THEN CLICK "CLOSE" TO RETURN TO THIS PAGE
From: Pierce Piano Atlas, 12th Edition (2008, Larry Ashley Publisher, Albuquerque, NM).
Note: To obtain the age of your piano and details about the manufacturer, click: Pierce Piano Atlas--"the world's most authoritative publication on piano manufacturers, past and present." To learn how a piano works and how to go about buying one, we encourage you to purchase The Piano Book.
A - IN OUR SHOP
![1 - Damaged by fire--front view 1 - Damaged by fire--front view](1 - Damaged by fire--front view.JPG) |
1 - Damaged by fire--front view |
|
![2 - Loading onto trailer in New London 2 - Loading onto trailer in New London](2 - Loading onto trailer in New London.JPG) |
2 - Loading onto trailer in New London |
|
![3 - In trailer 3 - In trailer](3 - In trailer.JPG) |
3 - In trailer |
|
![4 - Panels, action and keys removed 4 - Panels, action and keys removed](4 - Panels, action and keys removed.JPG) |
4 - Panels, action and keys removed |
|
For contact information, go to the "Home Page"
Selected pictures of the step-by-step improvement process
CLICK PICTURE FOR LARGER IMAGE, THEN CLICK "CLOSE" TO RETURN TO THIS PAGE
Original Manufacturer of this brand-name--Vose & Sons, Boston, MA
Established--1851, by James Whiting Vose
Other manufacturers of this brand-name--In the 1920s Vose built a new factory at Watertown, Greater Boston. Became part of American Piano Co. And Aeolian.
![5 - Action cleaned with compressed air 5 - Action cleaned with compressed air](5 - Action cleaned with compressed air.JPG) |
5 - Action cleaned with compressed air |
|
![6 - Panels stored on shop wall 6 - Panels stored on shop wall](6 - Panels stored on shop wall.JPG) |
6 - Panels stored on shop wall |
|
![7 - Keybed, pedal board, casters removed 7 - Keybed, pedal board, casters removed](7 - Keybed, pedal board, casters removed.JPG) |
7 - Keybed, pedal board, casters removed |
|
![8 - Loose sides reglued to keybed 8 - Loose sides reglued to keybed](8 - Loose sides reglued to keybed.JPG) |
8 - Loose sides reglued to keybed |
|
BEFORE: Fire-damaged piano
Selected pictures of the step-by-step improvement process
CLICK PICTURE FOR LARGER IMAGE, THEN CLICK "CLOSE" TO RETURN TO THIS PAGE
![9 - Bass strings removed, will be sent to string maker 9 - Bass strings removed, will be sent to string maker](9 - Bass strings removed, will be sent to string maker.JPG) |
9 - Bass strings removed, will be sent to string maker |
|
![10 - End blocks re-sized 10 - End blocks re-sized](10 - End blocks re-sized.JPG) |
10 - End blocks re-sized |
|
![11 - New casters installed 11 - New casters installed](11 - New casters installed.JPG) |
11 - New casters installed |
|
![12 - Keybed & legs refitted 12 - Keybed & legs refitted](12 - Keybed & legs refitted.JPG) |
12 - Keybed & legs refitted |
|
![13 - New lower panel stop installed 13 - New lower panel stop installed](13 - New lower panel stop installed.JPG) |
13 - New lower panel stop installed |
|
![14 - Fallboard ends sanded, new snakker knobs installed 14 - Fallboard ends sanded, new snakker knobs installed](14 - Fallboard ends sanded, new snakker knobs installed.JPG) |
14 - Fallboard ends sanded, new snakker knobs installed |
|
![15 - Left endblock sanded for better fit 15 - Left endblock sanded for better fit](15 - Left endblock sanded for better fit.JPG) |
15 - Left endblock sanded for better fit |
|
![16 - Fallboard re-installed to check fit 16 - Fallboard re-installed to check fit](16 - Fallboard re-installed to check fit.JPG) |
16 - Fallboard re-installed to check fit |
|
![17 - Fall board no longer jams! 17 - Fall board no longer jams!](17 - Fall board no longer jams!.JPG) |
17 - Fall board no longer jams! |
|
![18 - Music rest fittings repaired 18 - Music rest fittings repaired](18 - Music rest fittings repaired.JPG) |
18 - Music rest fittings repaired |
|
![19 - New lower panel latch installed 19 - New lower panel latch installed](19 - New lower panel latch installed.JPG) |
19 - New lower panel latch installed |
|
![20 - Left edge of music rest sanded 20 - Left edge of music rest sanded](20 - Left edge of music rest sanded.JPG) |
20 - Left edge of music rest sanded |
|
![21 - New Music rest springs installed 21 - New Music rest springs installed](21 - New Music rest springs installed.JPG) |
21 - New Music rest springs installed |
|
![22 - Completely reassembled to check fit before going to refinisher 22 - Completely reassembled to check fit before going to refinisher](22 - Completely reassembled to check fit before going to refinisher.JPG) |
22 - Completely reassembled to check fit before going to refinisher |
|
![23 - String sizes guide prepared 23 - String sizes guide prepared](23 - String sizes guide prepared.JPG) |
23 - String sizes guide prepared |
|
![24 - Treble strings removed 24 - Treble strings removed](24 - Treble strings removed.JPG) |
24 - Treble strings removed |
|
![25 - Panels and boards moved to Frank's Custom Furniture for refinishing 25 - Panels and boards moved to Frank's Custom Furniture for refinishing](25 - Panels and boards moved to Frank's Custom Furniture for refinishing.JPG) |
25 - Panels and boards moved to Frank's Custom Furniture for refinishing |
|
![26 - Soundboard refinished and new understring felt installed 26 - Soundboard refinished and new understring felt installed](26 - Soundboard refinished and new understring felt installed.JPG) |
26 - Soundboard refinished and new understring felt installed |
|
![27 - Re-stringing & re-pinning treble section 27 - Re-stringing & re-pinning treble section](27 - Re-stringing & re-pinning treble section.JPG) |
27 - Re-stringing & re-pinning treble section |
|
![28 - Treble re-strung, pressure bar & braid installed, chipped to pitch 28 - Treble re-strung, pressure bar & braid installed, chipped to pitch](28 - Treble re-strung, pressure bar & braid installed, chipped to pitch.JPG) |
28 - Treble re-strung, pressure bar & braid installed, chipped to pitch |
|
![29 - Bass section restrung, repinned, chipped to pitch 29 - Bass section restrung, repinned, chipped to pitch](29 - Bass section restrung, repinned, chipped to pitch.JPG) |
29 - Bass section restrung, repinned, chipped to pitch |
|
![30 - Plate area masked for refinishing 30 - Plate area masked for refinishing](30 - Plate area masked for refinishing.JPG) |
30 - Plate area masked for refinishing |
|
![31 - All cabinet components shipped to refinisher 31 - All cabinet components shipped to refinisher](31 - All cabinet components shipped to refinisher.JPG) |
31 - All cabinet components shipped to refinisher |
|
![32 - Front Panel stripped & sanded 32 - Front Panel stripped & sanded](32 - Front Panel stripped & sanded.JPG) |
32 - Front Panel stripped & sanded |
|
![33 - All veneered surfaces stripped & sanded 33 - All veneered surfaces stripped & sanded](33 - All veneered surfaces stripped & sanded.JPG) |
33 - All veneered surfaces stripped & sanded |
|
![34 - Leg stripped & sanded 34 - Leg stripped & sanded](34 - Leg stripped & sanded.JPG) |
34 - Leg stripped & sanded |
|
![35 - Main body repaired, stripped & sanded 35 - Main body repaired, stripped & sanded](35 - Main body repaired, stripped & sanded.JPG) |
35 - Main body repaired, stripped & sanded |
|
![36 - Remove bridle tapes & rails from action 36 - Remove bridle tapes & rails from action](36 - Remove bridle tapes & rails from action.JPG) |
36 - Remove bridle tapes & rails from action |
|
![37 - Remove sample hammers, dampers & damper rails. 37 - Remove sample hammers, dampers & damper rails.](37 - Remove sample hammers, dampers & damper rails..JPG) |
37 - Remove sample hammers, dampers & damper rails. |
|
![38 - Temporarily store dampers & railes during reconditioning 38 - Temporarily store dampers & railes during reconditioning](38 - Temporarily store dampers & railes during reconditioning.JPG) |
38 - Temporarily store dampers & railes during reconditioning |
|
![39 - Mail sample hammers to hammer supplier 39 - Mail sample hammers to hammer supplier](39 - Mail sample hammers to hammer supplier.JPG) |
39 - Mail sample hammers to hammer supplier |
|
![40 - Broken flanges replaced 40 - Broken flanges replaced](40 - Broken flanges replaced.JPG) |
40 - Broken flanges replaced |
|
![41 - Defective butts, butt plates & shanks replaced. It's now ready for all new hammer heads. . . 41 - Defective butts, butt plates & shanks replaced. It's now ready for all new hammer heads. . .](41 - Defective butts, butt plates & shanks replaced. It's now ready for all new hammer heads. . ..JPG) |
41 - Defective butts, butt plates & shanks replaced. It's now ready for all new hammer heads. . . |
|
![42 - Install odd-numbered hammer heads 42 - Install odd-numbered hammer heads](42 - Install odd-numbered hammer heads.JPG) |
42 - Install odd-numbered hammer heads |
|
![43 - All hammer heads installed 43 - All hammer heads installed](43 - All hammer heads installed.JPG) |
43 - All hammer heads installed |
|
![44 - Catcher leather replaced in mid-section 44 - Catcher leather replaced in mid-section](44 - Catcher leather replaced in mid-section.JPG) |
44 - Catcher leather replaced in mid-section |
|
![45 - Broken hammer spings replaced 45 - Broken hammer spings replaced](45 - Broken hammer spings replaced.JPG) |
45 - Broken hammer spings replaced |
|
![46 - Hammer rail polished, new hammer rail cloth 46 - Hammer rail polished, new hammer rail cloth](46 - Hammer rail polished, new hammer rail cloth.JPG) |
46 - Hammer rail polished, new hammer rail cloth |
|
![47 - Hammer rail installed. New bridal tapes attached to bridal wires 47 - Hammer rail installed. New bridal tapes attached to bridal wires](47 - Hammer rail installed. New bridal tapes attached to bridal wires.JPG) |
47 - Hammer rail installed. New bridal tapes attached to bridal wires |
|
![48 - Hammer spring rail installed 48 - Hammer spring rail installed](48 - Hammer spring rail installed.JPG) |
48 - Hammer spring rail installed |
|
![49 - Back from the Refinisher's, cabinet and keybed 49 - Back from the Refinisher's, cabinet and keybed](49 - Back from the Refinisher's, cabinet and keybed.JPG) |
49 - Back from the Refinisher's, cabinet and keybed |
|
![50 - Back from the Refinisher's, side wall and top 50 - Back from the Refinisher's, side wall and top](50 - Back from the Refinisher's, side wall and top.JPG) |
50 - Back from the Refinisher's, side wall and top |
|
![51 - Back from the Refinisher's, panels and boards 51 - Back from the Refinisher's, panels and boards](51 - Back from the Refinisher's, panels and boards.JPG) |
51 - Back from the Refinisher's, panels and boards |
|
![52 - Back from the Refinisher's, fallboard decal 52 - Back from the Refinisher's, fallboard decal](52 - Back from the Refinisher's, fallboard decal.JPG) |
52 - Back from the Refinisher's, fallboard decal |
|
![53 - Keyboard, keyframe and legs reassembled 53 - Keyboard, keyframe and legs reassembled](53 - Keyboard, keyframe and legs reassembled.JPG) |
53 - Keyboard, keyframe and legs reassembled |
|
![54 - Brass pedals cleaned & polished 54 - Brass pedals cleaned & polished](54 - Brass pedals cleaned & polished.JPG) |
54 - Brass pedals cleaned & polished |
|
![55 - Pedal board reassembled & installed 55 - Pedal board reassembled & installed](55 - Pedal board reassembled & installed.JPG) |
55 - Pedal board reassembled & installed |
|
![56 - Damper bar cleaned, polished, re-installed 56 - Damper bar cleaned, polished, re-installed](56 - Damper bar cleaned, polished, re-installed.JPG) |
56 - Damper bar cleaned, polished, re-installed |
|
![57 - Damper levers cleaned, polished 57 - Damper levers cleaned, polished](57 - Damper levers cleaned, polished.JPG) |
57 - Damper levers cleaned, polished |
|
![58 - Keys cleaned & buffed 58 - Keys cleaned & buffed](58 - Keys cleaned & buffed.JPG) |
58 - Keys cleaned & buffed |
|
![59 - Treble damper levers & felts installed 59 - Treble damper levers & felts installed](59 - Treble damper levers & felts installed.JPG) |
59 - Treble damper levers & felts installed |
|
![60 - Keys, punchings, blocks, keyslip dry-fitted at both ends of piano 60 - Keys, punchings, blocks, keyslip dry-fitted at both ends of piano](60 - Keys, punchings, blocks, keyslip dry-fitted at both ends of piano.JPG) |
60 - Keys, punchings, blocks, keyslip dry-fitted at both ends of piano |
|
![65 - Hammers aligned to strings 65 - Hammers aligned to strings](65 - Hammers aligned to strings.JPG) |
65 - Hammers aligned to strings |
|
![66 - Damper spoons regulated 66 - Damper spoons regulated](66 - Damper spoons regulated.JPG) |
66 - Damper spoons regulated |
|
![67 - Multiple pitch raises and tunings before delivery 67 - Multiple pitch raises and tunings before delivery](67 - Multiple pitch raises and tunings before delivery.JPG) |
67 - Multiple pitch raises and tunings before delivery |
|
![68 - Music rest assembled 68 - Music rest assembled](68 - Music rest assembled.JPG) |
68 - Music rest assembled |
|
![61 - Fallboard & music desk assembled to check heights 61 - Fallboard & music desk assembled to check heights](61 - Fallboard & music desk assembled to check heights.JPG) |
61 - Fallboard & music desk assembled to check heights |
|
![62 - New underkey punchings & cloth installed 62 - New underkey punchings & cloth installed](62 - New underkey punchings & cloth installed.JPG) |
62 - New underkey punchings & cloth installed |
|
![63 - Capstans, letoff, keyheights regulated 63 - Capstans, letoff, keyheights regulated](63 - Capstans, letoff, keyheights regulated.JPG) |
63 - Capstans, letoff, keyheights regulated |
|
![64 - Keys leveled, key dip 64 - Keys leveled, key dip](64 - Keys leveled, key dip.JPG) |
64 - Keys leveled, key dip |
|
![69 - Ready for delivery! 69 - Ready for delivery!](69 - Ready for delivery!.JPG) |
69 - Ready for delivery! |
|
![70 - Close-up of front, music rest extended 70 - Close-up of front, music rest extended](70 - Close-up of front, music rest extended.JPG) |
70 - Close-up of front, music rest extended |
|
![71 - Close-up of right leg 71 - Close-up of right leg](71 - Close-up of right leg.JPG) |
71 - Close-up of right leg |
|
![72 - Close-up of pedals assembly 72 - Close-up of pedals assembly](72 - Close-up of pedals assembly.JPG) |
72 - Close-up of pedals assembly |
|
![73 - Lid closed 73 - Lid closed](73 - Lid closed.JPG) |
73 - Lid closed |
|
![74 - Close-up of music rest pattern 74 - Close-up of music rest pattern](74 - Close-up of music rest pattern.JPG) |
74 - Close-up of music rest pattern |
|
![75 - Close-up of fallboard decal and keys 75 - Close-up of fallboard decal and keys](75 - Close-up of fallboard decal and keys.JPG) |
75 - Close-up of fallboard decal and keys |
|
AFTER: Ready for delivery!