Current & Recent Projects
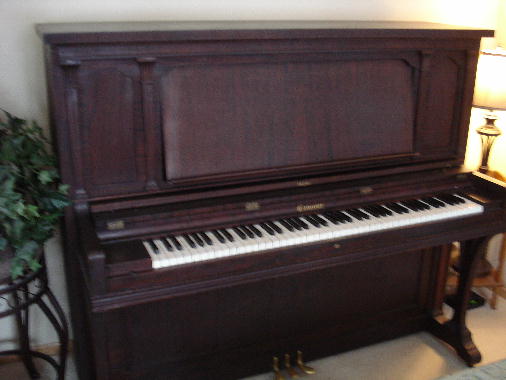
53" Conover Upright #156593 (1911)

53" Conover Upright #156593 (1911)
Traditional mahogany cabinet.. Action reconditioned in February 2018 for the owner in Milaca, MN.
IMPROVEMENTS:
Complete Cleaning--Clean strings, pressure bar, keybed, keypins, pedal mechanisms.
Recondition ActionReshape hammers, Tighten action screws, Replace or repair defective parts: all bridle tapes, 15 brass flanges.
Clean Keytops--Air clean keys, check bushings, replace as necessary.
NOTE: In our experience with older upright pianos, when we recondition a piano's action we also conduct a complete regulation. By special arrangement with the owners of this piano, we only reconditioned the action to address immediate concerns--many of the brass hammer flanges were cracked and the bridle tapes were badly worn. We will conduct a complete regulation sometime in the future.
Original Manufacturer of this brand-name--Conover Piano Co.
Established--1883 by J. Frank Conover, Oregon, Illinois.
Other brand-names used by this manufacturer--Conover, Schiller Cable
Other manufacturers of this brand-name--Schiller Cable Piano Co. (after 1966), Samick Music Corporation (after 1996)
From: Pierce Piano Atlas, 12th Edition (2008, Larry Ashley Publisher, Albuquerque, NM).
Note: To obtain the age of your piano and details about the manufacturer, click: Pierce Piano Atlas--"the world's most authoritative publication on piano manufacturers, past and present." To learn how a piano works and how to go about buying one, we encourage you to purchase The Piano Book.
A - IN OUR SHOP
 |
9 - Fine reshaping with sanding block |
|
 |
10 - Clean, lubricate hammer springs & hammer rail supports |
|
 |
11 - Re-install hammer spring rail and hammer rail |
|
 |
12 - Install new bridle tapes with glue |
|
 |
1 - Remove action rails and dampers |
|
 |
2 - Remove all bridle tapes |
|
 |
3 - Keys, rails, dampers in storage |
|
 |
4 - Replace 12 cracked flanges |
|
 |
5 - Cracked flanges |
|
 |
6 - Special flange repair |
|
 |
7 - Bend warped shanks, turn misaligned hammers |
|
 |
8 - Rough hammer reshaping with Dremel Sander |
|
B - AT THE PIANO OWNER'S HOME
For contact information, go to the "Home Page"
Selected pictures of the step-by-step improvement process
CLICK PICTURE FOR LARGER IMAGE, THEN CLICK "CLOSE" TO RETURN TO THIS PAGE
Picture #22 - Plays well again. A great beginner's piano, has a pleasant, mellow tone. Immaculate cabinet
exterior--has been treated with care over its 106-year history.
 |
13 - Clean & lubricate dampers and tighten damper springs |
|
 |
14 - Reinstall dampers |
|
 |
15 - Install bridle tapes onto bridle wires |
|
 |
16 - Action ready for the piano--front view |
|
 |
17 - Action ready for the piano--back view |
|
 |
18 - Clean underside of keys, rebush as needed |
|
 |
19 - Clean front & top of keys, rebush as needed |
|
 |
20 - Re-install keys |
|
 |
21 - Re-install reconditined action, regulate capstans |
|
 |
22 - Phase One Completed |
|